Saturday, June 23, 2012

Featured Parts: Axles

Lego axles, in addition to connecting pegs, will be a crucial element of any robot you choose to construct. Whether used for structural support, or connecting two wheels along a single axis, lego axle beams have hundreds of important applications.

Axles come in about a dozen different sizes, and they geometry (unsurprisingly) meshes well with other lego blocks. It's not easy to determine spacing rules for beams, because most of the time spacial distances are dictated by the axle itself!

In my post about differential drives, we detailed how you can connect wheels on two separate axles; however keeping them aligned in the same order, spinning independently. You can also use wheels on the same axle, so that it will spin by itself along with the attached wheels, however this construct has many limitations when it comes to application in advanced topics.

As mentioned above, the geometrical construction of axles coincide nicely with corresponding lego parts. Here's an example of a gear run through an axle, all held in place by a supporting beam block. I thought it illustrated the different relationships between the parts nicely:

Thursday, June 14, 2012

1000th Pageview!

A big thank you to everyone who's contributed towards this, and I'm proud to report that Mindstorm Mechanics has just received its 1000th pageview. I know this isn't really a post, but I just wanted to thank everybody for taking the time and reading the musings of a obsessed teen.

Thank you to all.

Monday, June 11, 2012

Video: Lego Cube Solver

Found this really cool video on youtube of a cube solver. This has some pretty advanced programming, but I also liked the interface the user created. I'll try and do a larger write up on it in a few days, but till then- enjoy!

Wednesday, May 16, 2012

Featured Parts: Connecting Pegs

Note: This is the first post in a series meant to help familiarize people with different parts abundant in many mindstorm sets. Send me feedback!

Mindstorms do a pretty good job of giving you total flexibility among design. One thing that sets Lego's apart from other competitive starter robotic kits is a pretty simple part: the connector peg.

While coming in many different variants, the two most common connector pegs are silver and black
Non-friction
Friction


These pegs are the simplest way to connect two beams, creating a degree of motion which is usually essential in most robots, however simple.

 Silver, or non-friction pegs do exactly as the name suggests, and spin freely within the slots on the beams they're inserted in. Usually, they are the peg of choice for adding a part that undergoes large amounts of motion (i.e. Wheels, levers, etc.)

Black pegs are sturdier, and when inserted into beams, will lock two beams together, providing limiting the amount of movement possible.


Sunday, May 13, 2012

New Ideas

Hey everyone, so I wanted to see if any of you guys had a robot you'd like to see. Any applications/programming/purpose is acceptable, and if you had any questions I'll try to answer them as well.

Comment below or email me at ashwin.johri@gmail.com for your suggestions/questions!

Thanks

Tuesday, April 24, 2012

Walking With Mindstorms

Making a walking robot is another unique challenge that can be tackled with Mindstorms. The above picture is a set of legs I built, adapting a design I saw in this book.

I explain how the above system works in this video:

The other important concept to keep in mind as you design a walking robot, is COG; or center of gravity. Because only one foot of your robot will be on the ground at a given time, you'll either need to find a way to shift the COG over a single side, or you'll need to alternate the leg placements on either side, allowing for a successful walk, devoid of awkward falls and lurches.

Sunday, April 22, 2012

My Lego Mindstorms Creations

Really really really cool video I found. This guy details his mindstorm creations, and some of them are really neat designs. Check it out!


Tuesday, April 17, 2012

Apologies

I'm really sorry for not updating this thing in a while...been a really busy week for me. Stay tuned because I have a couple of really neat posts set up for later this week!

Thanks!

Sunday, April 8, 2012

Concept Vehicle: ATV

I've always had an interest in ATV's and there are numerous necessities I've found that are required to build a successful one:

- Power/Torque (any speed is just bonus)
- Flexible chassis (stiff vehicles get stuck and lose traction)
- Good suspension system (goes along with above; as suspension systems enable you to keep traction)

Trying to implement all these into a Lego robot, I came up with this:


This is a concept ATV I made out of Mindstorms, I followed the three guidelines I set for myself above, and I'll explain all of them in further detail here in this post.

1. The drive system- Power and torque are essential in an ATV, as the motor must be able to push the robot across any terrain. If you recall an earlier post, I demonstrated how you can get power through gear ratios. I utilized a worm gear meshed with a 24t gear to give me a ridiculous 1:24 gear ratio. That's 24x the power the motor is outputting.
Example of a worm gear              
I transferred the motors power into the worm gear, which turned the 24t in a gearbox that came standard with my RCX. So though I dealt with a low speed bot, the power that came with it was extremely helpful.


The gearbox 
2. A flexible chassis- I put this as a guideline for myself because I felt like without a certain degree of flexibility from your robot, Mindstorm bots can be prone to getting stuck on uneven terrain. Adding a degree of rotation on your chassis helps keep this from occurring.

To achieve this, I simply built the chassis in two separate parts; the drive system, and the suspension mount. This way I was able to lock the two together using two single beams, adding a degree of flexibility.

The rotation radius of the bot is illustrated in these two pictures of the chassis.


3. A suspension system- A good suspension system is NECESSARY for an ATV. Unfortunately these are a bit tricky to build out of Mindstorm parts. I found an interesting solution using the rubber bands found in many kits, and attached the front two wheels to independently attached mounted suspension beams, supported by said rubber bands. By inverting the system, you have a make-shift suspension.

Normal drive
There are other guidelines into making a successful ATV as well, however these should get you going for now.

Send me pictures of your own ATV's! ashwin.johri@gmail.com
Happy building guys.


Suspension flex

Monday, April 2, 2012

Building a Steering Drive

Steering is an essential component of building a Robot. What fun is a machine that can only go forwards and backwards? 

There are a lot of different ways to steer a robot, and one of the most common one is to build a rack and pinion steering drive. The steering drive is used by basically anything with a steering wheel, it's set up so that a gear on the end of the wheel (called a pinion) is meshed with a rack connected to the wheels. 

The rack is set up such that there are two degrees of motion, on either side of the set-up, and there's also a non-moving piece to give the wheels something to rotate around. Here's a good (non-lego) diagram of the system:


Now implementing the rack and pinion system into Lego form is tricky, but there are tons of unique solutions out there that I encourage you to take a look at. A quick google search of "Lego Steering Drive" will pull up some really cool results. 

In an effort to demonstrate on possible model for a Lego steering drive, I built this: 


The steering shaft is controlled by an independent motor, and by playing with the rack sizes, and wheel spacing, you can manipulate the turn radius as well. Building a solid chassis is important for steering drives, as they can quickly become heavy, and excessive moving parts can put stress on a robot. I locked mine with perpendicular blocks you can see laying across the underside, beneath the steering column. 

Here's a view on the pinion gear meshed with the rack, it's important to make sure the pinion has enough torque to turn the whole system. Locking gears, and jammed motors are a nightmare to builders.


Steering drives, while not an easy build for most people, really provide versatility to the bots you make. In the future, we'll explore some more steering systems, like the differential pivot wheel, and reversing motors. 
I'll leave you with a video displaying the turning radius and the piece movement involved with the execution of the drive:

Thursday, March 29, 2012

Constructing a Geartrain

example of lego gears
Gear trains are really REALLY helpful. If you're a serious Mindstormer, then I guarantee you have used gear trains and that you'll continue to use them extensively. I've mentioned them a lot in some of my other pieces, but I felt like the topic merited it's own post.

Gears are classified by the number of little ridges or "teeth" on them. Common Lego gears include the 8t, 16t, 24t, and the largest: the 40t.

Constructing a gear train is all about ratios. If you mesh an 8t gear with a 40t one, you'll get an 8 : 40  or 1 : 5 gear ratio. (This also happens to be the highest ratio attainable with only two Lego gears).

Compounding gears will help you increase power or speed though. This is best explained with the diagram below:
Combining gears along the same axle will help you gear up or down, increasing power or torque as you do so. Remember that the more torque you get, you're sacrificing that much speed, and vice-versa. It's important to establish the ideal ratio for whatever bot you're creating.

Once you've mastered this, you can work on implementing numerous gear trains in the same system, a topic I've covered here.

Monday, March 26, 2012

The RCX

The RCX is my preferred base computer for Lego Robots. Lego has a more recent mindstorm computer called the NXT, and though the NXT is probably more user friendly, I don't think it matches the versatility and compatibility of the 2.0 RCX. 

Of course choosing your computer is mostly preference, however rcx motors are smaller and it's generally easier to build a chassis around these models compared to the nxt layout. The NXT does hold an advantage in that it's easier to program, however I don't feel like that pro makes the nxt the better computer.

Wednesday, March 21, 2012

Shifting Gears: the Transmission

Shifting gears with Lego is a complicated task, albeit with numerous effective solutions. Today I designed the transmission above, and I'm going to talk about designing your own transmission in this post.

Deciding your gear ratios is the first step. What kind of power do you want? What vehicle will be using this transmission? Is speed a concern? This transmission used two unique gear ratios:

Gear train #1:            24t:8t:40t:24t (3:1:5:3)
     - This gear train provides torque and power sacrificing speed. The 24t is part of the transmission and when you shift up, the gear train is discontinued while the 24t in the second housing shifts into place, completing...

Gear train #2:            24t:40t:8t:24t (3:5:1:3)
    - Here you increase the speed, as you utilize the mammoth 5:1 ratio you're getting in the middle. This transmission is completed when you've shifted up, and using 24t's on the same axle helps complete the train.

The basic design of all transmissions are the same. Utilize two independent gear ratios which you can switch between at the push of a handle/knob. These manual  transmissions can have an unlimited amount of speeds depending on how creative you wanna get.

Also, the two independent trains must be connected to the same axle you're attempting to drive. Failure to do this will result in no forward motion by your vehicle.

Transmissions are fun to play with, and if you can successfully build one and implement it in your Mindstorm bot, few things can match the performance. Here's a video of the transmission in action, and I look forward to using it in future bots:

Differential Drives

By far the most common drive system for Lego robots, the differential drive is probably the easiest to make. Utilizing two parallel drive wheels on either side of the robot, they can be powered separately, or use a single motor as well.

The diagram to the right shows what a basic differential drive looks like. Bevel gears placed in the central gear housing allow the axles to turn independently, enabling the robot to turn in place, and maneuver pretty easily.

The following chart is adapted from "Building Robots with Lego Mindstorms" by the Ferrari Brothers and displays the different behaviors of  a robot in accordance to its wheels (powered by the differential drive).

Using different combinations of speed and direction, the robot has the ability to cover any amount of space, and turns at any angle. All this in addition to being very easy to implement. 

I assembled an example of a standard drive, showing how you can use the bevel gears inside the housing to attach the axles, and connecting it to an RCX is as easy as sliding two beams through it. 


As always, I encourage you to send me your designs, and contact me with any questions/comments/concerns. Happy building!

Tuesday, March 20, 2012

Building Robots with Lego Mindstorms

I'm working on a new post for later today or tomorrow, but I wanted to put this out there beforehand.

Buy this book. This is a must have for anyone with an inkling of interest in robots or Legos. It goes in-depth on topics I regularly discuss here, and the authors have some of the nicest designs for Mindstorms I've ever seen.

Monday, March 19, 2012

The Skid Steer Drive

The Skid Steer drive is truly a classic drive system. Usually incorporating treads or 6 wheels, good examples of skid-steer drives in real life include excavators, tanks, and other utility construction equipment.

A common variation of the differential drive (more on that later), the skid-steer has:

-better grip on rough floors/terrains
-more torque and power, where friction uses up some of the motors power
-easily maneuverable, however programming a skid steer to go straight is a little tricky.

The one I built above uses two motors powered by the same RCX. The chassis is divided into three parts (seen here). Two different mounts for each independent tread, and a central mount for the RCX and motors.

The wider base provides stability, which is important for slow moving treads, and a low center of gravity keeps accidents like tipping, and slipping from occurring.

An example of a clutch gear.
Another important component of a skid-steer (and pretty much all drives) is to incorporate elements to keep your motor from jamming. If a tread or a wheel gets caught, but the motor keeps trying to apply power, there's a dangerous chance of a lot of broken parts. My design incorporates a clutch gear which provides a certain domain of resistance before the clutch keeps the motor spinning with no damage (regardless of the status of the wheels).

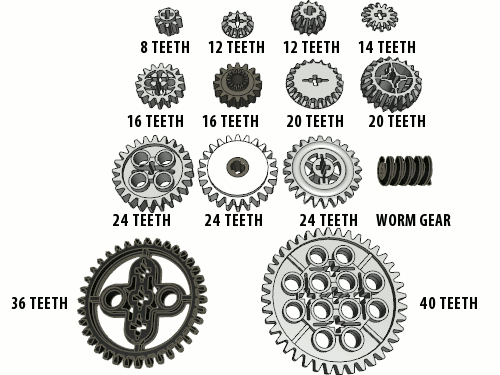
Finally, shifting gears, and increasing the ratio provides massive increases in power, sacrificing speed in the process. Because my motor is directly linked to the 8t, which turns the 24t, my gear ratio ends up like:

                                                                               8t : 24t = 1:3

Which basically means that my wheels are turning at 3x the power the motor is outputting.

Skid-steer drives are fun to build, and even more satisfying to watch in action, and I definitely recommend experimenting with a few of your own designs to get started. If you have any alternate designs or suggestions shoot me an email: ashwin.johri@gmail.com

Introduction to the Blog

Welcome to Mindstorm Mechanics- Engineering Downsized.

My name is Ashwin, currently a student in southeastern Michigan. There's not much to me, but I created this site purely out of my enthusiasm for mechanical creations of all kinds.

I started this blog as an effort to create and demonstrate different topics in mechanical engineering, utilizing Lego Mindstorms as a great tool for these designs. I'm a fan of Mindstorms for numerous reasons:

-They're user friendly
-They're easily programmable
-And it's easy to create and destroy projects with little effort.

In following posts, I aim to describe numerous different mechanical drive systems, different building techniques, a wide array of vehicles made possible, and as the blog continues to grow, I'll explore some programming pieces as well. 

I'd love for any feedback, and to receive designs and advice from other users out there, and you can always reach me at my email: ashwin.johri@gmail.com

Thanks for reading,
Ashwin